


使用jQuery仿苹果官网焦点图特效 - Web前端
作者:98wpeu发布时间:2026-09-28分类:网页前端技术浏览:16
这次我们要分享的这款JQuery焦点图非常特别,它的外观特别简单,但是又相当大气。焦点图的整体样式是仿苹果样式的,由于jQuery的运用,我们只要点击图片下方的缩略图即可达到图片切换的焦点图特效,这款jquery焦点图插件非常适合在产片展示的网页上使用。
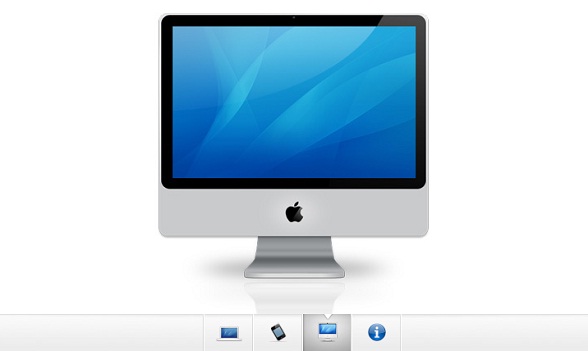
接下来我们一起分享一下实现这款苹果焦点图的过程及源码。
html代码:
复制代码 代码如下:
<div id="gallery">
<div id="slides" style="width: 3680px; margin-left: 0px;">
<div class="slide"><img width="920" height="400" alt="side" src="img/sample_slides/Macbook.jpg"></div>
<div class="slide"><img width="920" height="400" alt="side" src="img/sample_slides/iPhone.jpg"></div>
<div class="slide"><img width="920" height="400" alt="side" src="img/sample_slides/imac.jpg"></div>
<div class="slide"><a target="_blank" href="http://tutorialzine.com/2009/10/beautiful-apple-gallery-slideshow/"><img width="920" height="400" alt="side" src="img/sample_slides/info.jpg"></a></div>
</div>
<div id="menu">
<ul>
<li class="fbar inact"> </li><li class="menUItem inact act"><a href=""><img alt="thumbnAIl" src="img/sample_slides/thumb_macbook.png"></a></li><li class="menuitem inact"><a href=""><img alt="thumbnail" src="img/sample_slides/thumb_iphone.png"></a></li><li class="menuItem inact"><a href=""><img alt="thumbnail" src="img/sample_slides/thumb_imac.png"></a></li><li class="menuItem inact"><a href=""><img alt="thumbnail" src="img/sample_slides/thumb_about.png"></a></li>
</ul>
</div>
</div>
从以上HTML代码可以看出,整个焦点图由一些div构成图片容器,用ul li列表构成下面的缩略图。
CSS代码:
复制代码 代码如下:
#gallery{
/* css3 Box shadow */
-moz-box-shadow:0 0 3px #AAAAAA;
-WEBkit-box-shadow:0 0 3px #AAAAAA;
box-shadow:0 0 3px #AAAAAA;
/* CSS3 Rounded Corners */
-moz-border-radius-bottomleft:4px;
-webkit-border-bottom-left-radius:4px;
border-bottom-left-radius:4px;
-moz-border-radius-bottomright:4px;
-webkit-border-bottom-right-radius:4px;
border-bottom-right-radius:4px;
border:1px solid white;
background:url(img/panel.jpg) repeat-x bottom center #ffffff;
/* The width of the gallery */
width:920px;
overflow:hidden;
}
#slides{
/* this is the slide area */
height:400px;
/* jquery changes the width later on to the sum of the widths of all the slides. */
width:920px;
overflow:hidden;
}
.slide{
float:left;
}
#menu{
/* This is the container for the thumbnails */
height:45px;
}
ul{
margin:0px;
padding:0px;
}
li{
/* every thumbnail is a li element */
width:60px;
display:inline-block;
list-style:none;
height:45px;
overflow:hidden;
}
li.inact:hover{
/* The inactive state, highlighted on mouse over */
background:url(img/pic_bg.png) repeat;
}
li.act,li.act:hover{
/* The active state of the thumb */
background:url(img/active_bg.png) no-repeat;
}
li.act a{
cursor:default;
}
.fbar{
/* The left-most vertical bar, next to the first thumbnail */
width:2px;
background:url(img/divider.png) no-repeat right;
}
li a{
display:block;
background:url(img/divider.png) no-repeat right;
height:35px;
padding-top:10px;
}
a img{
border:none;
}
css代码也非常简单,都是一些简单设置而已。
JQuery代码:
复制代码 代码如下:
$(document).ready(function(){
/* This code is executed after the DOM has been completely loaded */
var totWidth=0;
var positions = new Array();
$('#slides .slide').each(function(i){
/* Traverse through all the slides and store their accumulative widths in totWidth */
positions[i]= totWidth;
totWidth += $(this).width();
/* The positions array contains each slide's commulutative offset from the left part of the container */
if(!$(this).width())
{
alert("Please, fill in width & height for all your images!");
returnfalse;
}
});
$('#slides').width(totWidth);
/* Change the cotnainer div's width to the exact width of all the slides combined */
$('#menu ul li a').click(function(e,keepscroll){
/* On a thumbnail click */
$('li.menuItem').removeClass('act').addClass('inact');
$(this).parent().addClass('act');
var pos = $(this).parent().PRevAll('.menuItem').length;
$('#slides').stop().Animate({marginLeft:-positions[pos]+'px'},450);
/* Start the sliding Animation */
e.preventDefault();
/* Prevent the default action of the link */
// StopPing the auto-advance if an icon has been clicked:
if(!keepScroll) clearinterval(itvl);
});
$('#menu ul li.menuItem:first').addClass('act').siblings().addClass('inact');
/* On page load, mark the first thumbnail as active */
/*****
*
* Enabling auto-advance.
*
****/
var current=1;
function autoAdvance()
{
if(current==-1) return false;
$('#menu ul li a').eq(current%$('#menu ul li a').length).trigger('click',[true]); // [true] will be passed as the keepScroll parameter of the click function on line 28
current++;
}
// The number of seconds that the slider will auto-advance in:
var changeEvery = 10;
var itvl = SetInterval(function(){autoAdvance()},changeEvery*1000);
/* end of customizations */
});
这是焦点图的重点,完成了图片滑块的动画逻辑,点击缩略图即可切换图片。
相关推荐
- JQuery 拾色器插件发布-jquery.icolor.js - Web前端
- 基于jquery1.4.2的仿flash超炫焦点图播放效果 - Web前端
- jquery 新浪网易的评论块制作 - Web前端
- 基于jquery的模态div层弹出效果 - Web前端
- 基于jquery的一个图片hover的插件 - Web前端
- 基于jquery的一个简单的脚本验证插件 - Web前端
- JQuery 插件制作实践 xMarquee插件V1.0 - Web前端
- Jquery+JSon 无刷新分页实现代码 - Web前端
- 24款热门实用的jQuery插件推荐 - Web前端
- 3Z版基于jquery的图片复选框(asp.net+jquery) - Web前端
- 网页前端技术排行
-
- 1[Web前端]用javascript实现默认图片替代未显示的图片 - Web前端
- 2分析Iconfont-阿里巴巴矢量常用图标库 - Web前端
- 3jQuery实例教程:制作网页中可折叠的面板 - Web前端
- 4基于jquery的滚动条滚动固定div(附演示下载) - Web前端
- 5【第六章】Foundation之按钮和下拉功能 - Web前端
- 6分享精心挑选的12款优秀jQuery Ajax分页插件和教程 - Web前端
- 7jQuery编写widget的一些技巧分享 - Web前端
- 8jQuery实现鼠标移到元素上动态提示消息框效果 - Web前端
- 9在Mac/PC上远程调试iPhone/iPad上的网页 - Web前端
- 最近发表
-
- WordPress随机显示特色图片插件:Random Post Thumbnails
- KeePass实现Chrome浏览器自动填充密码方法一
- LNMP一键包nginx 301强制跳转到https教程
- KeePass实现Chrome浏览器自动填充密码方法二
- #建站# 免费的VPS管理软件Xshell8/Xftp8中文版下载
- 使用Xshell 8连接VPS教程_电脑登录vps的方法
- WordPress评论界面添加烟花????效果
- 不同浏览器书签同步方案:坚果云+Floccus_详细使用教程
- iOS端KeePassXC客户端APP:Strongbox Password Safe
- 给WordPress评论中的Gravatar头像图片添加ALT属性