


jquery插件uploadify实现带进度条的文件批量上传 - Web前端
作者:98wpeu发布时间:2026-08-21分类:网页前端技术浏览:123
导读:有时项目中需要一个文件批量上传功能时,个人认为uploadify是快速简便的解决方案,分享给大家供大家参考,具体如下先上效果图:具体代码如下:在页面中如下完整页面代码...
有时项目中需要一个文件批量上传功能时,个人认为uploadify是快速简便的解决方案,分享给大家供大家参考,具体如下
先上效果图:
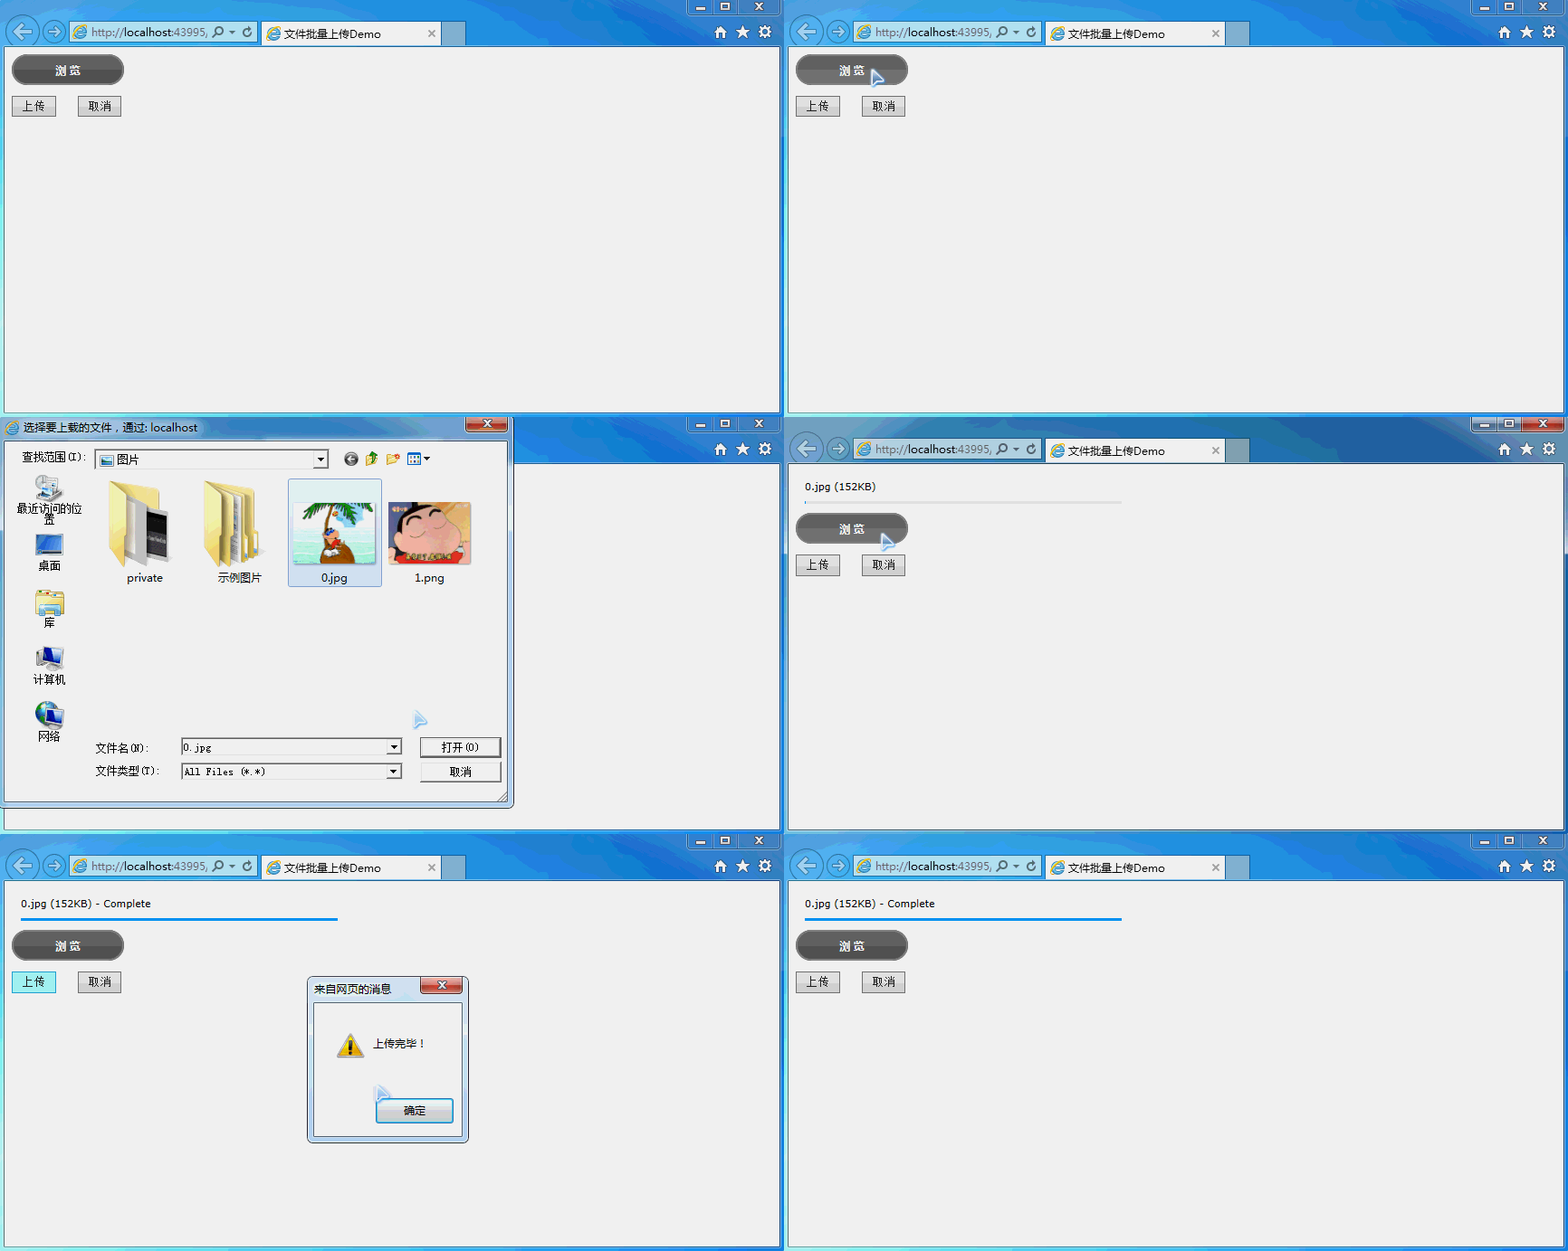
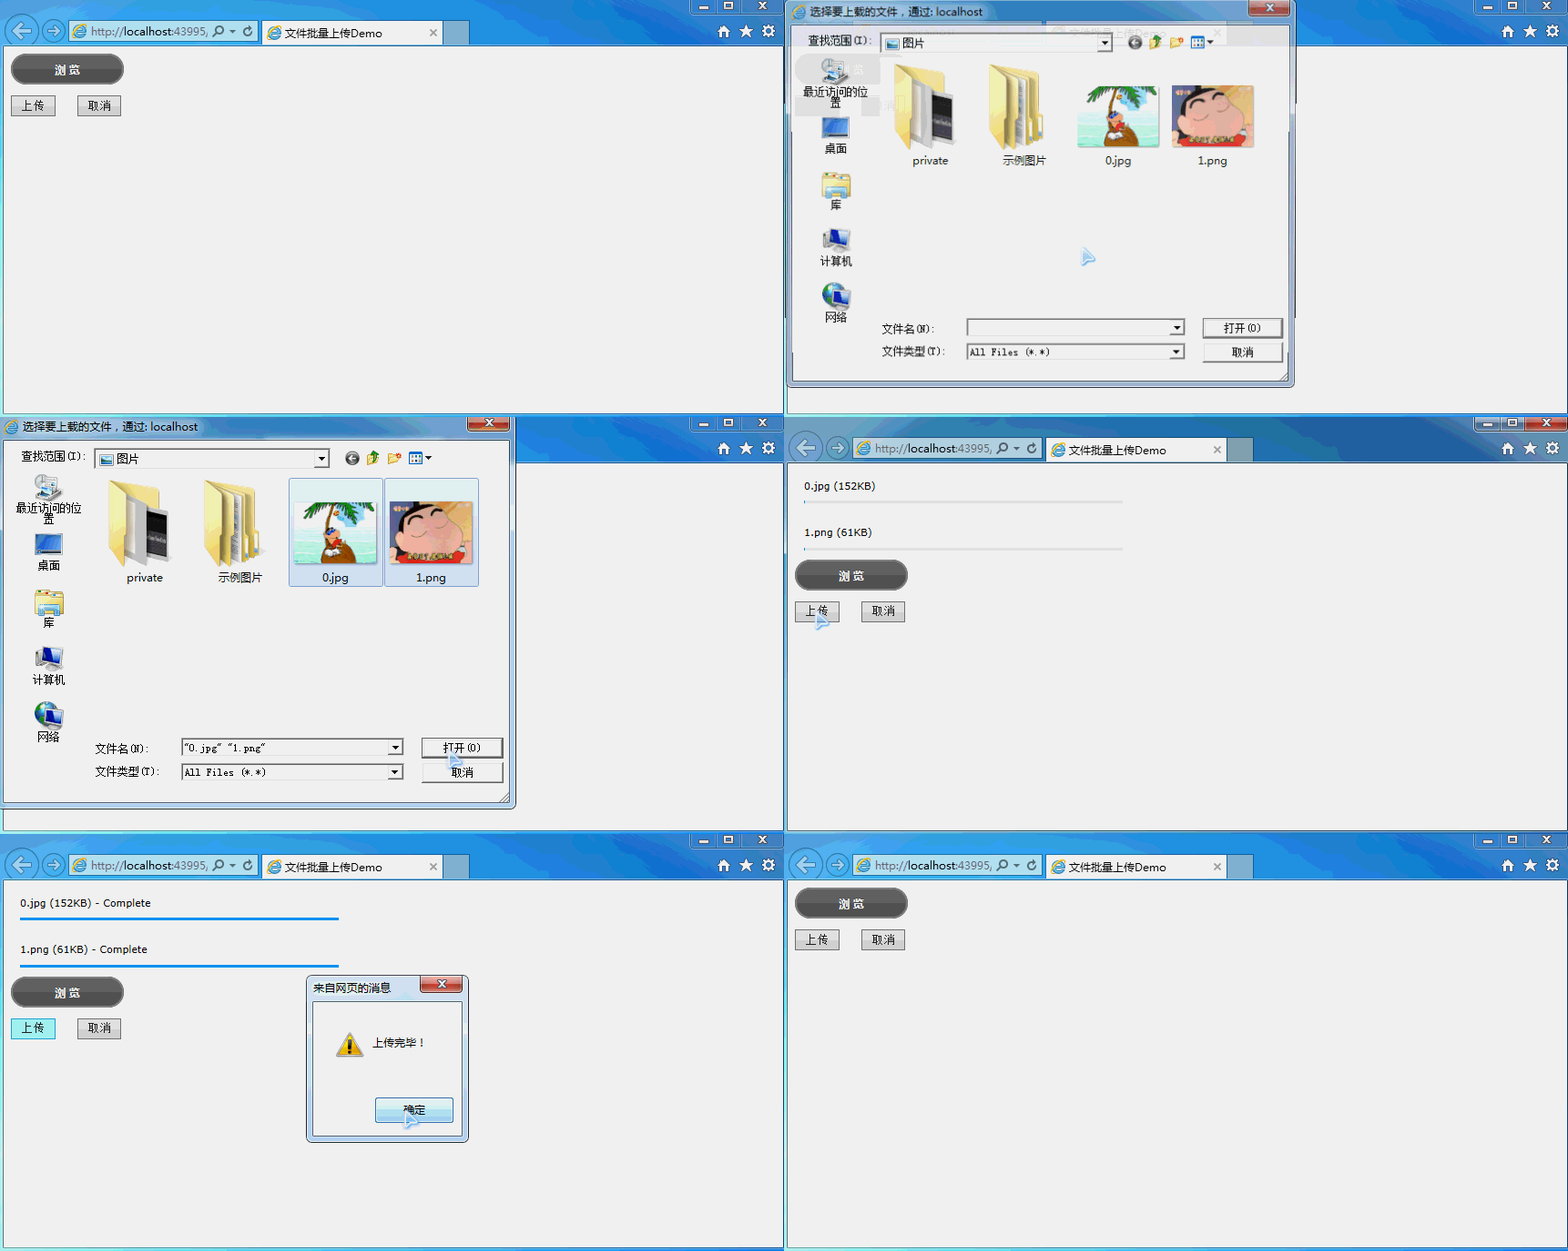
具体代码如下:
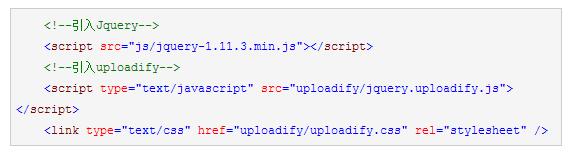
在页面中如下
完整页面代码
<%@ Page Language="c#" AutoeventWireup="true" codeFile="Default.aspx.cs" Inherits="_Default" %>

<!DOCtype html>

<HTML xmlns="http://www.w3.org/1999/xhtml">
<head runat="server">
<meta HTTP-eqUIv="Content-Type" content="text/html; charset=utf-8"/>
 <title>文件批量上传Demo</title>
 <!--引入JQuery-->
 <script src="JS/jQuery-1.11.3.min.js"></script>
 <!--引入uploadify-->
 <script type="text/javascript" src="uploadify/jquery.uploadify.js"></script>
 <link type="text/CSS" href="uploadify/uploadify.css" rel="StyleSheet" />

 <script type="text/JavaScript">
  $(function () {
   var guid = '<%=Request["guid"] %>';
   var type = '<%=Request["type"] %>';
   if (guid == null || guid == "") {
    guid = newGuid();
   }
   if (type != Null) {
    type = type + '/';
   }

   $('#file_upload').uploadify({
    'swf': 'uploadify/uploadify.swf',    //FLASH文件路径
    'buttonText': '浏 览',      //按钮文本
    'uploader': 'uploadhandler.ashx?guid=' + guid, //处理ASHX页面
    'FormData': { 'folder': 'picture', 'isCover': 1 },   //传参数
    'queueID': 'fileQueue',      //队列的ID
    'queueSizeLimit': 10,       //队列最多可上传文件数量,默认为999
    'auto': false,         //选择文件后是否自动上传,默认为true
    'multi': true,         //是否为多选,默认为true
    'removeCompleted': true,      //是否完成后移除序列,默认为true
    'fileSizeLimit': '0',       //单个文件大小,0为无限制,可接受KB,MB,GB等单位的字符串值
    'fileTypeDesc': 'All Files',     //文件描述
    'fileTypeExts': '*.*',       //上传的文件后缀过滤器
    'onQueueComplete': function (queuedata) {  //所有队列完成后事件
     alert("上传完毕!");
    },
    'onerror': function (event, queueId, fileObj, errorObj) {
     alert(errorObj.type + ":" + errorObj.info);
    },
    'onUploadStart': function (file) {
    },
    'onUploadSuccess': function (file, data, response) { //一个文件上传成功后的响应事件处理
     //var data = $.parsejson(data);//如果data是JSON格式
     //var errMsg = "";
    }

   });
  });

  function newGuid() {
   var guid = "";
   for (var i = 1; i <= 32; i++) {
    var n = Math.floor(Math.ranDOM() * 16.0).toString(16);
    guid += n;
    if ((i == 8) || (i == 12) || (i == 16) || (i == 20))
     guid += "-";
   }
   return guid;
  }

  //执行上传
  function doUpload() {
   $('#file_upload').uploadify('upload', '*');
  }
 </script>

</head>
<body>
 <FORM id="form1" runat="server" enctype="multipart/form-data">
  <div id="fileQueue" class="fileQueue"></div>
  <div>
   <input type="file" name="file_upload" id="file_upload" />
   <p>
    <input type="button" class="shortbutton" id="BTnUpload" onclick="doUpload()" value="上传" />

    <input type="button" class="shortbutton" id="btnCancelUpload" onclick="$('#file_upload').uploadify('cancel')" value="取消" />
   </p>
   <div id="div_show_files"></div>
  </div>
 </Form>
</body>
</html>
UploadHandler.ashx代码:
using System;
using System.WEB;
using System.IO;

public class UploadHandler : IHttpHandler {

 public void PRocessRequest (HttPContext context) {
  context.Response.ContentType = "text/plAIn";
  context.Request.ContentEncoding = System.Text.Encoding.getEncoding("UTF-8");
  context.Response.ContentEncoding = System.Text.Encoding.GetEncoding("UTF-8");
  context.Response.Charset = "UTF-8";

  if (context.Request.Files.Count > 0)
  {
   #region 获取上传路径
   string uploadFolder = GetUploadFolder();
   #endregion

   if (System.IO.Directory.Exists(uploadFolder))
   {//如果上传路径存在
    HttppostedFile file = context.Request.Files["Filedata"];
    String filePath = Path.Combine(uploadFolder, file.FileName);
    file.SaveAs(filePath);
    context.Response.Write("0");
   }
   else
   {
    context.Response.Write("2");
   }
  }
 }

 public bool IsReusable {
  get {
   return false;
  }
 }

 /// <summary>
 /// 返回不带后缀的文件名
 /// </summary>
 /// <param name="fileName"></param>
 /// <returns></returns>
 public static string GetFirstFileName(string fileName)
 {
  return Path.GetFileNameWithoutExtension(fileName);
 }

 /// <summary>
 /// 获取上传目录
 /// </summary>
 /// <returns></returns>
 public static string GetUploadFolder()
 {
  string rootPath = Httpcontext.Current.Server.MAPPath("~");
  return Path.Combine(rootPath, "test");
 }

}
文件上传.NET默认有大小限制,像IIS限制的30M默认请求大小。如果不想修改IIS,又想突破这个大小的限制,比如上传1GB大小的文件。
这是修改Web.config即可实现。
<?xml version="1.0" encoding="utf-8"?>

<!--
 -->

<configuration>

 <system.web>
  <compilation debug="true" targetFramework="4.0" />
  <httpRuntime maxRequestlength="1073741824"/>
 </system.web>

 <!--用于设置文件上传的最大允许大小(单位:bytes)-->
 <system.webServer>
  <security>
  <requestfiltering>
   <!--修改服务器允许最大长度(1GB)-->
   <requestLimits maxAllowedContentLength="1073741824"/>
  </requestFiltering>
  </security>
 </system.webServer>

</configuration>
希望本文所述对大家学习Javascript程序设计有所帮助。
相关推荐
- jQuery验证Checkbox是否选中的代码 推荐 - Web前端
- 20个非常棒的 jQuery 幻灯片插件和教程分享 - Web前端
- Jquery插件之打造自定义的select标签 - Web前端
- JQuery扩展插件Validate—4设置错误提示的样式 - Web前端
- 基于jQuery的星级评分插件 - Web前端
- jQuery ajax 路由和过滤器使用说明 - Web前端
- 关于html+ashx开发中几个问题的解决方法 - Web前端
- jQuery选择器的工作原理和优化分析 - Web前端
- 基于jQuery实现的当离开页面时出现提示的实现代码 - Web前端
- jQuery .tmpl(), .template()学习资料小结 - Web前端
- 网页前端技术排行
-
- 1[Web前端]用javascript实现默认图片替代未显示的图片 - Web前端
- 2分析Iconfont-阿里巴巴矢量常用图标库 - Web前端
- 3jQuery实例教程:制作网页中可折叠的面板 - Web前端
- 4【第六章】Foundation之按钮和下拉功能 - Web前端
- 5基于jquery的滚动条滚动固定div(附演示下载) - Web前端
- 6jQuery编写widget的一些技巧分享 - Web前端
- 7分享精心挑选的12款优秀jQuery Ajax分页插件和教程 - Web前端
- 8在Mac/PC上远程调试iPhone/iPad上的网页 - Web前端
- 9jQuery实现鼠标移到元素上动态提示消息框效果 - Web前端
- 最近发表
-
- WordPress随机显示特色图片插件:Random Post Thumbnails
- KeePass实现Chrome浏览器自动填充密码方法一
- LNMP一键包nginx 301强制跳转到https教程
- KeePass实现Chrome浏览器自动填充密码方法二
- #建站# 免费的VPS管理软件Xshell8/Xftp8中文版下载
- 使用Xshell 8连接VPS教程_电脑登录vps的方法
- WordPress评论界面添加烟花????效果
- 不同浏览器书签同步方案:坚果云+Floccus_详细使用教程
- iOS端KeePassXC客户端APP:Strongbox Password Safe
- 给WordPress评论中的Gravatar头像图片添加ALT属性